<?xml version="1.0" encoding="utf-8"?><feed xmlns="http://www.w3.org/2005/Atom" ><generator uri="https://jekyllrb.com/" version="3.10.0">Jekyll</generator><link href="/feed.xml" rel="self" type="application/atom+xml" /><link href="/" rel="alternate" type="text/html" /><updated>2026-07-13T13:57:41+00:00</updated><id>/feed.xml</id><title type="html">Anuraj R.</title><subtitle>Anuraj&apos;s Notes and Scribbles</subtitle><author><name>Anuraj R.</name></author><entry><title type="html">Desi Jarvis: Controlling Robots with Voice from Anywhere using MCP</title><link href="/robotics/desi-jarvis-yakrover-mcp-voice-robot-control/" rel="alternate" type="text/html" title="Desi Jarvis: Controlling Robots with Voice from Anywhere using MCP" /><published>2026-03-01T00:00:00+00:00</published><updated>2026-03-01T00:00:00+00:00</updated><id>/robotics/desi-jarvis-yakrover-mcp-voice-robot-control</id><content type="html" xml:base="/robotics/desi-jarvis-yakrover-mcp-voice-robot-control/"><![CDATA[<p class="notice--info"><em>This post was written with assistance from Claude, an AI by Anthropic.</em></p>

<blockquote>
  <p>A video is worth a million words. Here’s Desi Jarvis in action before we get into the details:</p>
</blockquote>

<figure style="display: flex; gap: 20px; align-items: flex-start;">
    <div style="flex: 1;">
        <video controls="" style="width:100%; height:auto;">
            <source src="/assets/videos/2026-03-01-desi-jarvis-robots.MP4" type="video/mp4" />
            Your browser does not support the video tag.
        </video>
    </div>
    <div style="flex: 1;">
        <video controls="" style="width:100%; height:auto;">
            <source src="/assets/videos/2026-03-01-desi-jarvis-talk.MP4" type="video/mp4" />
            Your browser does not support the video tag.
        </video>
    </div>
</figure>
<p><br /></p>

<p>What if you could talk to your robots and they’d just listen? Not a scripted voice command system, but an actual AI assistant that understands context, speaks back to you, and controls a fleet of robots anywhere in the world. And yes, it works in Hindi and Hinglish too.</p>

<p>That’s what I built with <a href="https://github.com/YakRoboticsGarage/yakrover-8004-mcp"><strong>yakrover-8004-mcp</strong></a> and <a href="https://github.com/YakRoboticsGarage/yakrover-talk-mcp"><strong>yakrover-talk-mcp</strong></a> - a Desi Jarvis of sorts - and it’s been one of the most fun things I’ve worked on.</p>

<h3 id="from-cryptobot-to-mcp">From Cryptobot to MCP</h3>

<p>Our <a href="/robotics/tumbller-cryptobot-architecture/">earlier Tumbller Cryptobot experiment</a> explored the intersection of crypto and robotics - enabling payments and robot control via Farcaster frames. That was fun, but the control interface was tightly coupled to Farcaster and needed a centralized frame server sitting between the user and the robot.</p>

<p><strong>yakrover-8004-mcp</strong> takes a completely different approach. Instead of a centralized server mediating control, each robot registers itself on the ERC-8004 on-chain registry and exposes its capabilities as an MCP server. Any MCP client - Claude Code, Claude Desktop, or anything that speaks the protocol - can discover the robot on-chain and connect to it directly. No central server, no custom UI, no app to install.</p>

<p>It’s also a modular framework with a plugin architecture. Each robot is a plugin with three files (~100 lines of code), and the framework handles everything else - MCP server setup, ngrok tunneling, on-chain registration, fleet discovery.</p>

<h3 id="how-it-works">How It Works</h3>

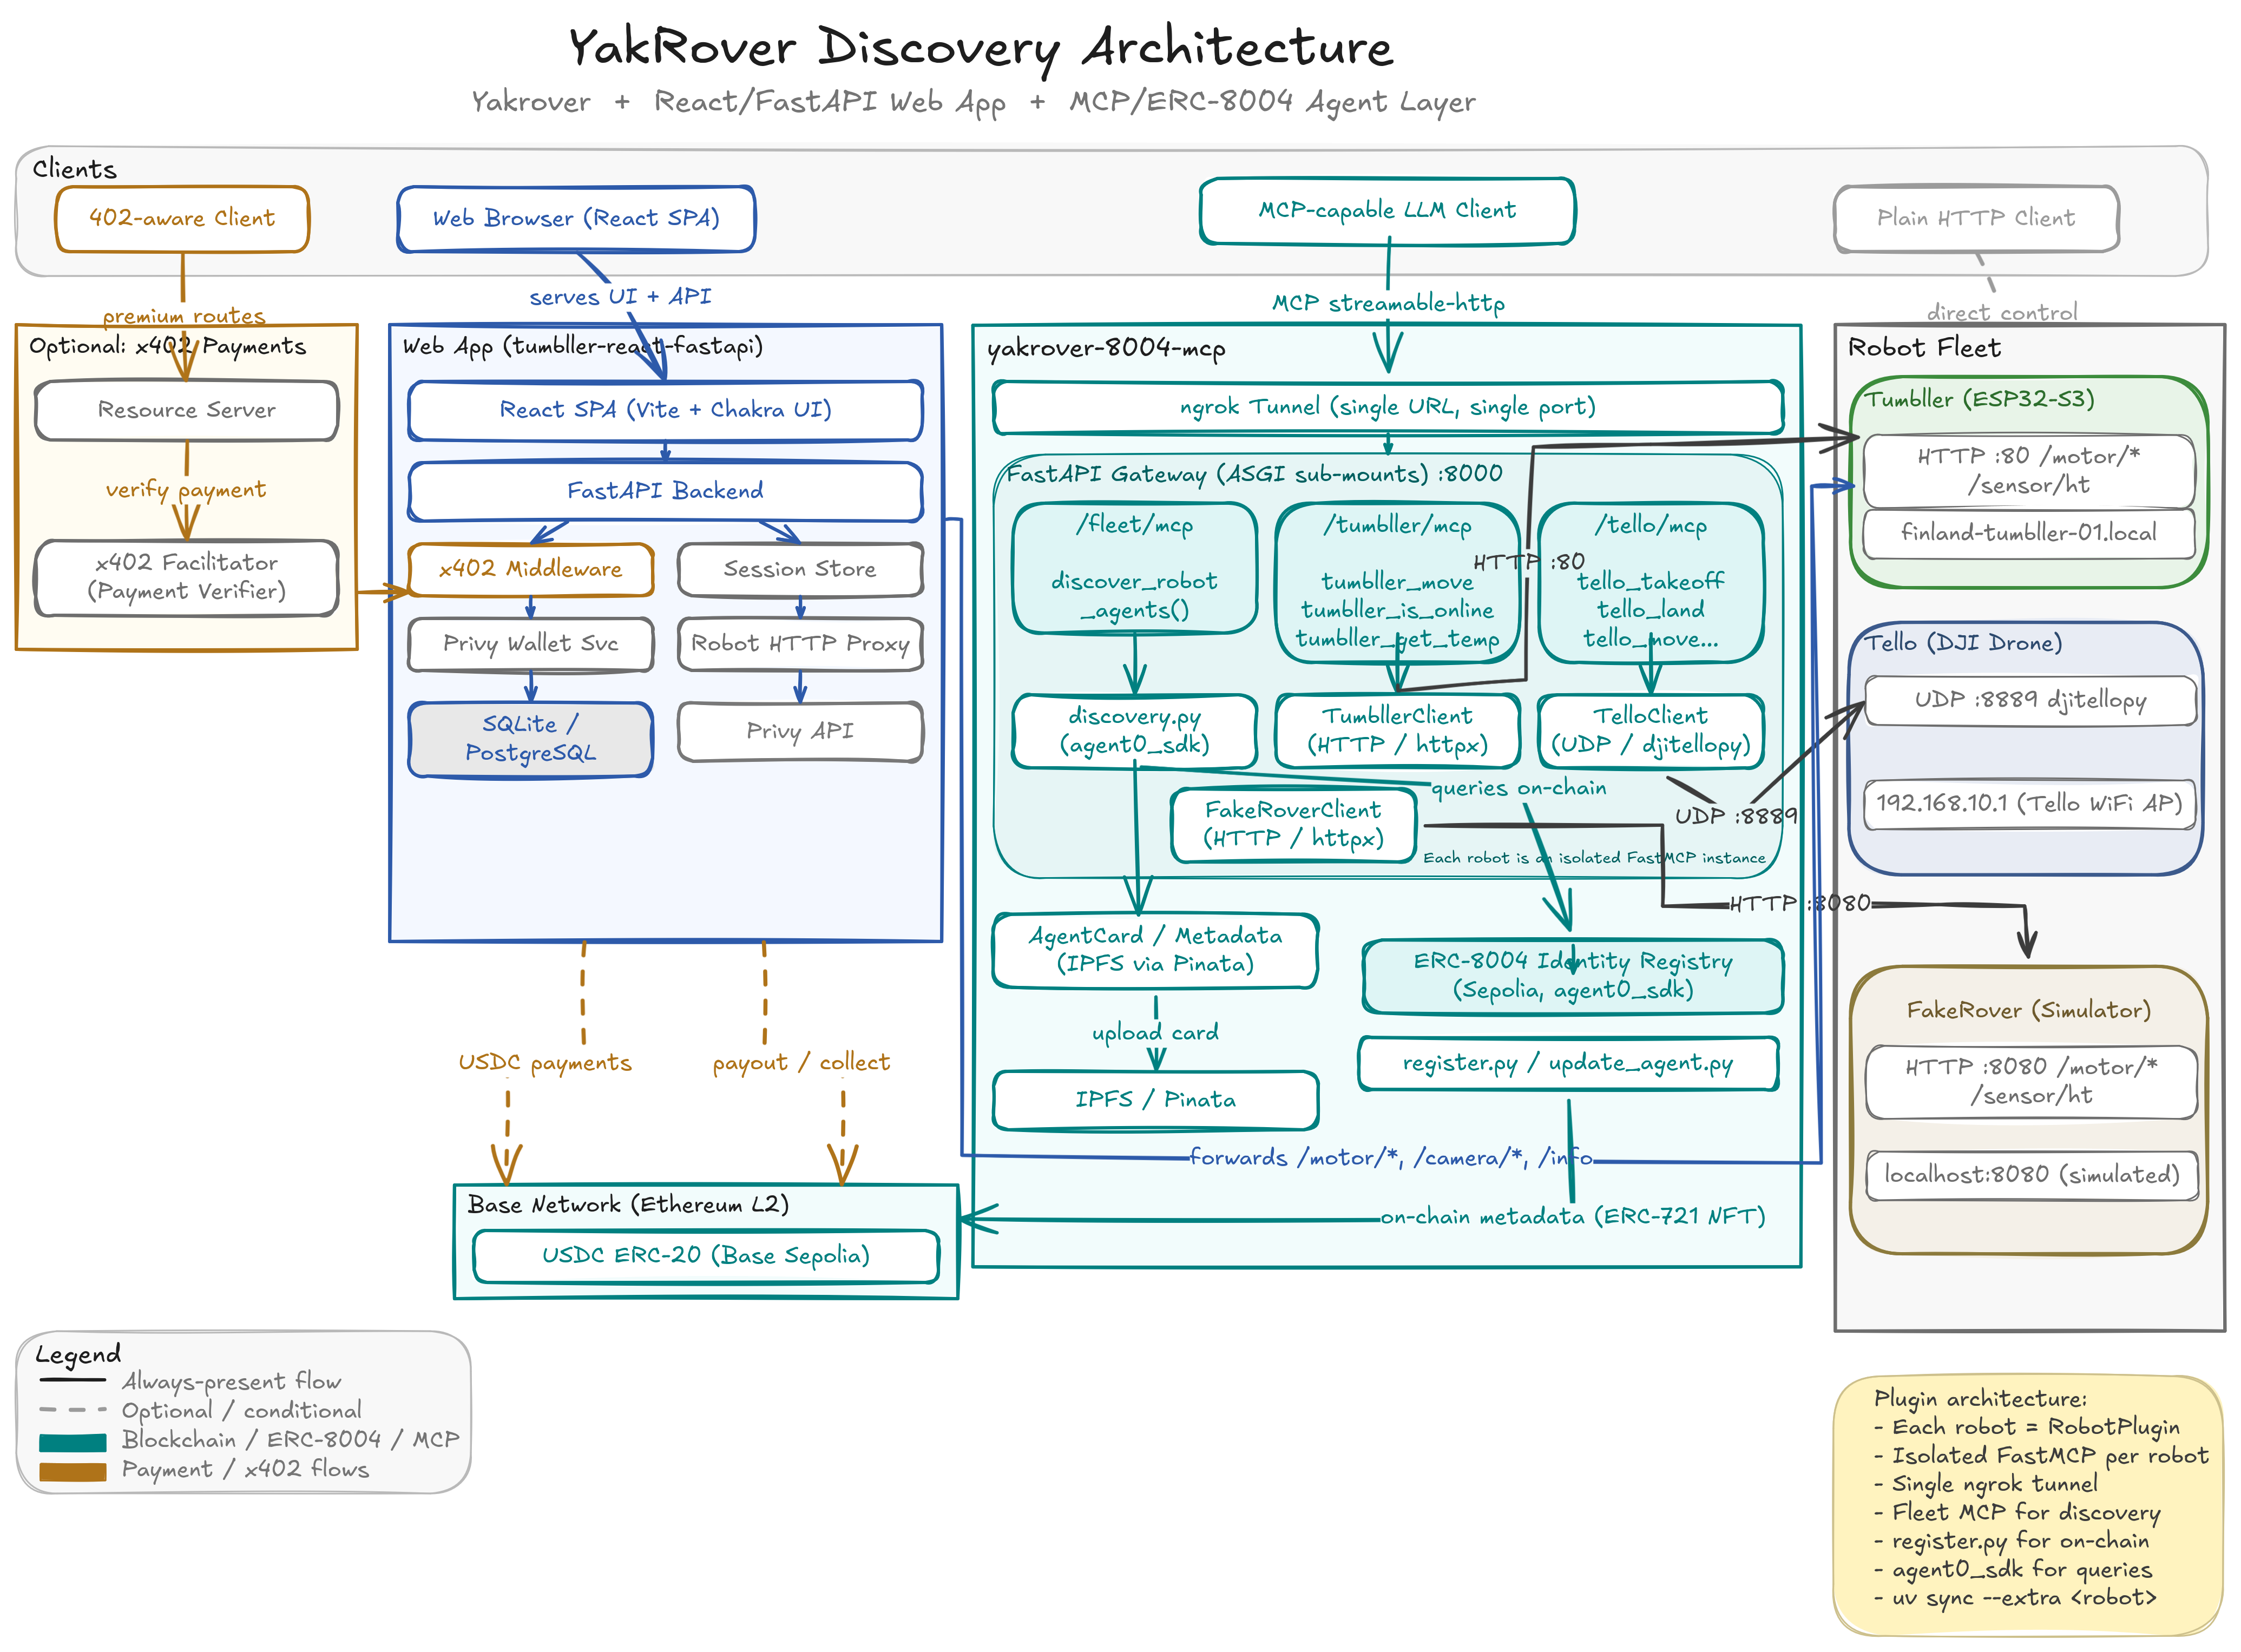
<figure>
    <a href="/assets/images/blog/2026-03-01-yakrover-8004-mcp.png"><img src="/assets/images/blog/2026-03-01-yakrover-8004-mcp.png" /></a>
    <figcaption>yakrover-8004-mcp Architecture</figcaption>
</figure>
<p><br /></p>

<p>The architecture uses FastAPI with ASGI sub-mounting. One port, one ngrok tunnel, multiple isolated robot servers:</p>

<div class="language-plaintext highlighter-rouge"><div class="highlight"><pre class="highlight"><code>LLM / Voice Agent
    |
Single ngrok tunnel
    |
FastAPI Gateway (port 8000)
    |--- /fleet/mcp       -&gt; Fleet Orchestrator (discovery + lifecycle)
    |--- /tumbller/mcp    -&gt; Tumbller self-balancing robot
    |--- /tello/mcp       -&gt; Tello drone
    |--- /fakerover/mcp   -&gt; Software simulator (no hardware needed)
</code></pre></div></div>

<p>Each robot gets its own FastMCP server instance, completely isolated. The Tumbller talks HTTP to an ESP32-S3, the Tello speaks UDP via djitellopy, and the FakeRover is a pure software simulator I use for development when I don’t have the physical robots around.</p>

<p>Adding a new robot? Just drop three files in <code class="language-plaintext highlighter-rouge">src/robots/myrobot/</code>:</p>

<div class="language-python highlighter-rouge"><div class="highlight"><pre class="highlight"><code><span class="c1"># __init__.py - Metadata + plugin registration
</span><span class="k">class</span> <span class="nc">MyRobotPlugin</span><span class="p">(</span><span class="n">RobotPlugin</span><span class="p">):</span>
    <span class="k">def</span> <span class="nf">metadata</span><span class="p">(</span><span class="bp">self</span><span class="p">)</span> <span class="o">-&gt;</span> <span class="n">RobotMetadata</span><span class="p">:</span>
        <span class="k">return</span> <span class="n">RobotMetadata</span><span class="p">(</span>
            <span class="n">name</span><span class="o">=</span><span class="s">"My Robot"</span><span class="p">,</span>
            <span class="n">robot_type</span><span class="o">=</span><span class="s">"differential_drive"</span><span class="p">,</span>
            <span class="n">fleet_provider</span><span class="o">=</span><span class="s">"yakrover"</span><span class="p">,</span>
            <span class="p">...</span>
        <span class="p">)</span>

<span class="c1"># client.py - Communication protocol (HTTP, UDP, serial, whatever)
# tools.py - MCP tool definitions
</span></code></pre></div></div>

<p>No framework changes needed. The plugin auto-discovery picks it up.</p>

<p>I explain the full architecture in these two videos from our YakRover weekly meetings:
<br /></p>
<iframe width="560" height="315" src="https://www.youtube-nocookie.com/embed/PrG1p_Jjslo" title="YouTube video player" frameborder="0" allow="accelerometer; autoplay; clipboard-write; encrypted-media; gyroscope; picture-in-picture; web-share" referrerpolicy="strict-origin-when-cross-origin" allowfullscreen=""></iframe>
<p><br /></p>
<iframe width="560" height="315" src="https://www.youtube-nocookie.com/embed/HPGSia3W8Ik" title="YouTube video player" frameborder="0" allow="accelerometer; autoplay; clipboard-write; encrypted-media; gyroscope; picture-in-picture; web-share" referrerpolicy="strict-origin-when-cross-origin" allowfullscreen=""></iframe>
<p><br /></p>

<h3 id="on-chain-discovery-with-erc-8004">On-Chain Discovery with ERC-8004</h3>

<p>Here’s where it gets interesting. Every robot in the fleet is registered on Ethereum Sepolia as an ERC-8004 agent. The metadata - robot name, type, MCP endpoint, available tools - gets stored on-chain and on IPFS via Pinata.</p>

<p>This means anyone, anywhere, can discover what robots are available:</p>

<div class="language-bash highlighter-rouge"><div class="highlight"><pre class="highlight"><code><span class="c"># Find all robots in the yakrover fleet</span>
uv run python scripts/discover.py <span class="nt">--provider</span> yakrover

<span class="c"># Auto-add discovered robots to Claude Code config</span>
uv run python scripts/discover.py <span class="nt">--add-mcp</span> <span class="nt">--scope</span> global
</code></pre></div></div>

<p>The discovery itself is exposed as an MCP tool. So an LLM can call <code class="language-plaintext highlighter-rouge">discover_robot_agents()</code> at runtime, find robots on-chain, connect to their MCP endpoints, and start controlling them. No hardcoded URLs, no manual configuration.</p>

<p>The full chain: <strong>LLM -&gt; Ethereum Sepolia -&gt; IPFS -&gt; ngrok tunnel -&gt; FastAPI gateway -&gt; Robot hardware</strong></p>

<h3 id="enter-the-desi-jarvis">Enter the Desi Jarvis</h3>

<p>The robot control side was working well. But I wanted something more natural - I wanted to talk to my robots. Not type commands, but actually speak to them. And I wanted my AI assistant to talk back.</p>

<p>That’s <strong>yakrover-talk-mcp</strong> - a voice-output MCP server that turns Claude into a speaking assistant. It uses ElevenLabs for text-to-speech and PipeWire for audio routing. PipeWire is the key here - it lets you route audio to any sink on your system. Local speakers, Bluetooth headphones, or a HomePod in the other room via AirPlay/RAOP. I have a helper script that manages audio sinks, so I can switch where Jarvis speaks from without touching any code. Walk into the living room, switch the sink to the HomePod, and now your robot status updates follow you around the house.</p>

<p>The setup uses MCP’s composability beautifully. Claude Code connects to both servers simultaneously:</p>
<ul>
  <li><strong>yakrover-8004-mcp</strong> for robot control (move, takeoff, land, get sensor data)</li>
  <li><strong>yakrover-talk-mcp</strong> for voice output (speak, play templates, switch voices)</li>
</ul>

<p>So when I say “Tello ko udao aur Tumbller ko aage bhejo” (take off the Tello and move the Tumbller forward), Claude understands the intent, calls the right MCP tools on the right robots, and speaks back confirming what it did.</p>

<h3 id="the-language-routing">The Language Routing</h3>

<p>One design decision I’m happy with is how language routing works. The server has clear rules baked into the tool docstrings (which Claude reads as instructions):</p>

<ul>
  <li><strong>English responses</strong> -&gt; <code class="language-plaintext highlighter-rouge">speak()</code> via ElevenLabs TTS</li>
  <li><strong>Hinglish/Hindi responses</strong> -&gt; Text only, no TTS (ElevenLabs doesn’t handle Hindi well yet)</li>
  <li><strong>Dramatic moments</strong> -&gt; Pre-recorded Bollywood templates via <code class="language-plaintext highlighter-rouge">play_template()</code></li>
</ul>

<p>Yes, I have pre-recorded Gabbar Singh and Sholay audio clips as response templates. When something dramatic happens - like a drone flip or a robot going offline - Claude can play the appropriate filmy response instead of synthesizing it. Because what’s the point of a Desi Jarvis without a little Bollywood drama?</p>

<h3 id="controlling-robots-from-anywhere">Controlling Robots from Anywhere</h3>

<p>The combination of ngrok tunneling, on-chain discovery, and MCP gives you true remote control from anywhere in the world. Here’s what a typical session looks like:</p>

<ol>
  <li>I start the gateway on my machine in Finland where the robots are physically connected</li>
  <li>The ngrok tunnel makes the MCP endpoints publicly accessible</li>
  <li>From my iPad at a coffee shop in Helsinki, I connect to Claude Code via Termius + Tailscale</li>
  <li>Claude discovers the robots on-chain and connects to their MCP servers</li>
  <li>I talk, Claude listens, robots move, Claude talks back</li>
</ol>

<p>The FakeRover simulator is useful here too. When I’m away from the physical robots, I can still develop and test the full voice -&gt; LLM -&gt; MCP -&gt; robot pipeline with simulated hardware. The simulator mimics the Tumbller’s HTTP endpoints exactly, including auto-stop behavior and drifting sensor readings.</p>

<h3 id="whats-next">What’s Next</h3>

<p>The plugin system doesn’t care what’s on the other end of the wire. A “robot” in the framework is really just anything with an API - any cyber-physical or IoT system works. A smart thermostat, a CNC machine, a greenhouse controller, a factory floor sensor array. If it exposes an interface, you can wrap it in a plugin and bring it into the fleet. Register it on-chain, and now anyone with an MCP client can discover and interact with it.</p>

<p>I’m currently working on adding a 3D printer as the next plugin. The idea is the same - expose the printer’s capabilities (start print, monitor progress, adjust temperatures) as MCP tools so Claude can manage print jobs conversationally. “Print the gear file I uploaded yesterday at 0.2mm layer height” is a lot nicer than navigating OctoPrint.</p>

<p>Beyond that, there’s more I want to do:</p>

<ul>
  <li><strong>Speech-to-text MCP server</strong> - Right now I use Wispr Flow or Voquill for voice input. I want a proper STT MCP server so the entire voice pipeline lives within MCP</li>
  <li><strong>Better Hindi/Hinglish TTS</strong> - Waiting for TTS models that handle code-mixed Indian languages well</li>
  <li><strong>Video streaming</strong> - Adding camera feeds as MCP resources so the LLM can see what the robots see</li>
  <li><strong>Multi-user sessions</strong> - Collaborative robot control sounds fun</li>
</ul>

<p>The whole point of this project is to make interacting with physical systems as natural as talking to a friend. No special apps, no custom UIs, just conversation. MCP makes this possible by giving LLMs a standardized way to discover and interact with the physical world.</p>

<h3 id="try-it-yourself">Try It Yourself</h3>

<p>Both repos are on GitHub: <a href="https://github.com/YakRoboticsGarage/yakrover-8004-mcp">yakrover-8004-mcp</a> and <a href="https://github.com/YakRoboticsGarage/yakrover-talk-mcp">yakrover-talk-mcp</a>.</p>

<p>If you want to try it, you can start with just the FakeRover simulator - no hardware needed. Start the simulator and the MCP gateway:</p>

<div class="language-bash highlighter-rouge"><div class="highlight"><pre class="highlight"><code><span class="c"># Terminal 1 — Start the simulator</span>
<span class="nv">PYTHONPATH</span><span class="o">=</span>src uv run python <span class="nt">-m</span> robots.fakerover.simulator

<span class="c"># Terminal 2 — Start the MCP gateway</span>
<span class="nv">PYTHONPATH</span><span class="o">=</span>src uv run python scripts/serve.py <span class="nt">--robots</span> fakerover
</code></pre></div></div>

<p>Then add the MCP server to Claude Code with a single command:</p>

<div class="language-bash highlighter-rouge"><div class="highlight"><pre class="highlight"><code>claude mcp add <span class="nt">--transport</span> http fakerover http://localhost:8000/fakerover/mcp
</code></pre></div></div>

<p>That’s it. Now you can ask Claude to move the rover, read its temperature, or check if it’s online. When you’re ready for real hardware, swap <code class="language-plaintext highlighter-rouge">fakerover</code> for <code class="language-plaintext highlighter-rouge">tumbller</code> or <code class="language-plaintext highlighter-rouge">tello</code> and point it at your robot.</p>

<p>For robots running remotely (say, in another country), the discovery script can find them on-chain and add them to your Claude config automatically:</p>

<div class="language-bash highlighter-rouge"><div class="highlight"><pre class="highlight"><code><span class="c"># Discover all yakrover fleet robots and add them to Claude Code</span>
uv run python scripts/discover.py <span class="nt">--add-mcp</span> <span class="nt">--scope</span> global
</code></pre></div></div>

<p>This reads the MCP endpoints from Ethereum Sepolia, and writes them into your <code class="language-plaintext highlighter-rouge">~/.claude.json</code> as HTTP MCP servers - ready to use from anywhere.</p>]]></content><author><name>Anuraj R.</name></author><category term="robotics" /><category term="Robotics" /><category term="AI" /><category term="Cryptobotics" /><category term="AI-assisted" /><summary type="html"><![CDATA[This post was written with assistance from Claude, an AI by Anthropic.]]></summary></entry><entry><title type="html">Claude Code on Your iPhone: Quick Remote Dev Setup with Termius + Tailscale</title><link href="/notes/remote-dev-setup-ipad-termius-tailscale/" rel="alternate" type="text/html" title="Claude Code on Your iPhone: Quick Remote Dev Setup with Termius + Tailscale" /><published>2026-01-04T00:00:00+00:00</published><updated>2026-01-30T20:00:00+00:00</updated><id>/notes/remote-dev-setup-ipad-termius-tailscale</id><content type="html" xml:base="/notes/remote-dev-setup-ipad-termius-tailscale/"><![CDATA[<p class="notice--info"><em>This post was written with assistance from Claude, an AI by Anthropic.</em></p>

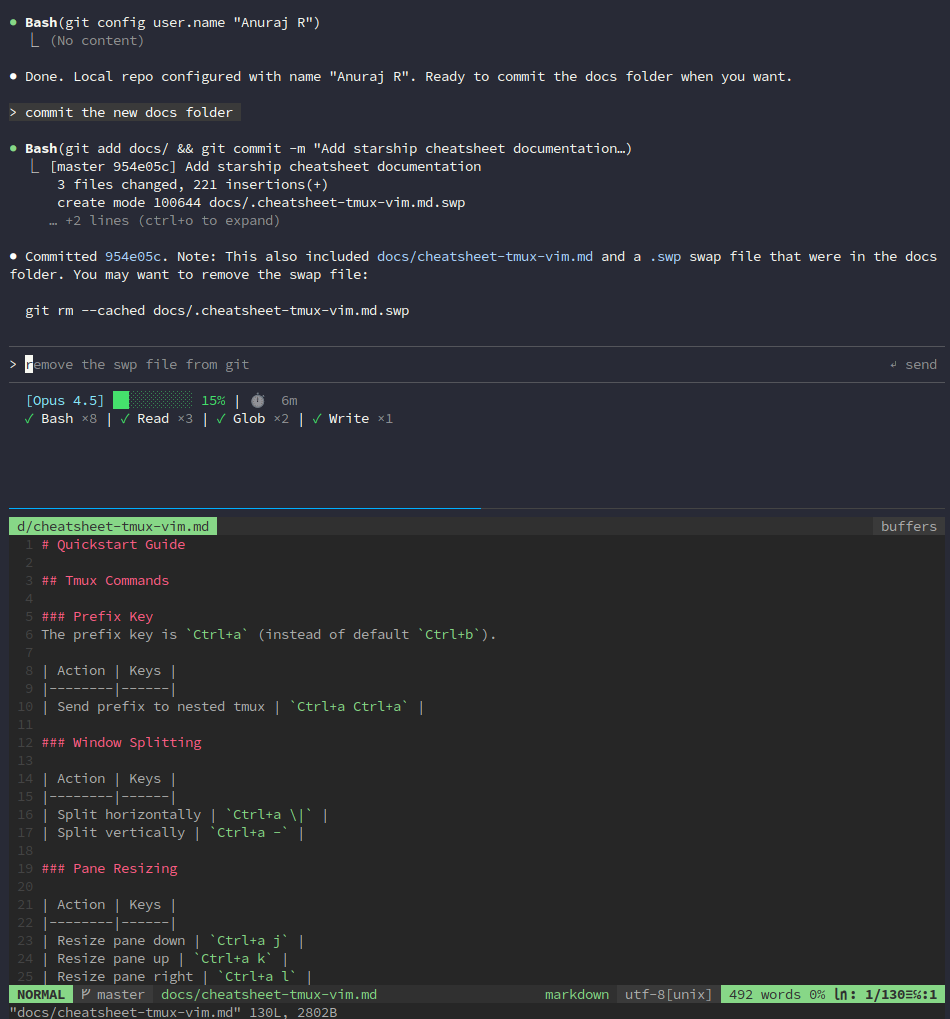
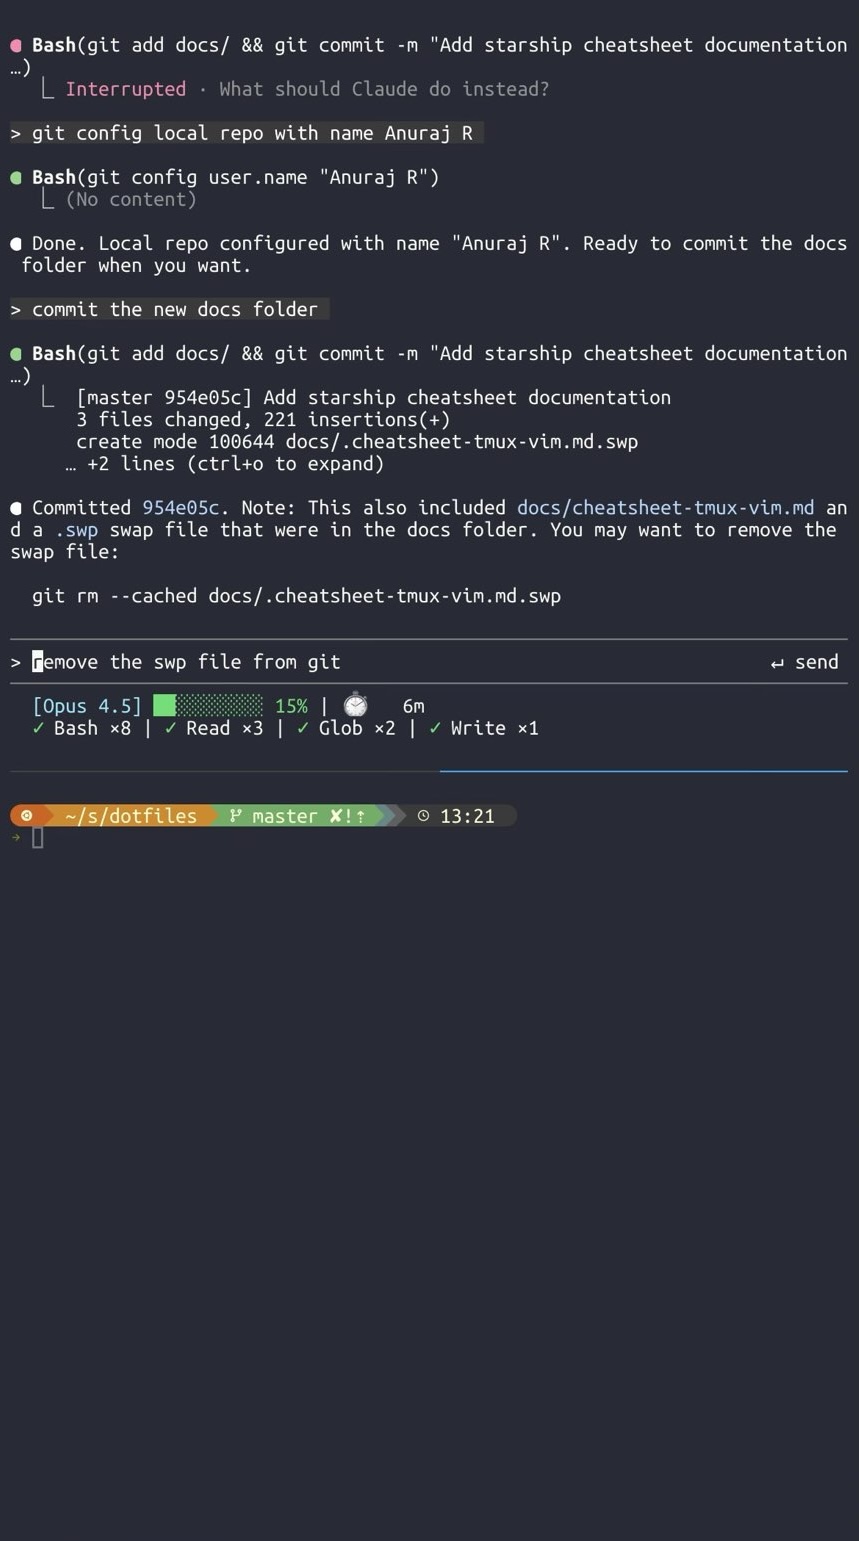
<p>Want to run Claude Code from your iPhone or iPad? Here’s how I set it up - and yes, it actually works great for quick fixes on the go.</p>

<figure style="display: flex; gap: 20px; align-items: flex-start; flex-wrap: wrap;">
    <div style="flex: 1; min-width: 300px;">
        <a href="/assets/images/blog/2026-01-04-termius-ipad.png">
            <img src="/assets/images/blog/2026-01-04-termius-ipad.png" style="width:100%; height:auto;" />
        </a>
        <figcaption>Claude Code running on iPad via Termius</figcaption>
    </div>
    <div style="flex: 1; min-width: 300px;">
        <a href="/assets/images/blog/2026-01-04-termius-iphone.jpg">
            <img src="/assets/images/blog/2026-01-04-termius-iphone.jpg" style="width:100%; height:auto;" />
        </a>
        <figcaption>Yes, even on iPhone - Termius has a great mobile keyboard</figcaption>
    </div>
</figure>
<p><br /></p>

<h3 id="what-you-need">What You Need</h3>

<ul>
  <li>An Ubuntu machine (local, cloud VM, whatever)</li>
  <li><a href="https://apps.apple.com/app/termius-ssh-client/id549039908">Termius app</a> on your iPhone/iPad (free version works)</li>
  <li>A <a href="https://tailscale.com">Tailscale</a> account (also free)</li>
</ul>

<h3 id="step-1-set-up-your-dev-machine">Step 1: Set Up Your Dev Machine</h3>

<p>SSH into your Ubuntu machine and run my setup script:</p>

<p class="notice--info"><strong>Friendly reminder:</strong> Always <a href="https://github.com/anuraj-rp/dotfiles.git">read scripts</a> before running them.</p>

<p class="notice"><strong>TLDR:</strong> <code class="language-plaintext highlighter-rouge">./setup-machine.sh &amp;&amp; sudo tailscale up</code> → tailscale login → <code class="language-plaintext highlighter-rouge">npm install -g @anthropic-ai/claude-code</code></p>

<div class="language-bash highlighter-rouge"><div class="highlight"><pre class="highlight"><code>git clone https://github.com/anuraj-rp/dotfiles.git ~/dotfiles
<span class="nb">cd</span> ~/dotfiles
./setup-machine.sh
</code></pre></div></div>

<p><strong>Don’t want everything?</strong> Run individual scripts instead:</p>

<div class="language-bash highlighter-rouge"><div class="highlight"><pre class="highlight"><code>./install-tailscale.sh  <span class="c"># Required - for remote access</span>
./install-nodejs.sh     <span class="c"># Required - for Claude Code</span>
./install-tmux.sh       <span class="c"># Recommended - keeps sessions alive</span>
</code></pre></div></div>

<p>Skip what you don’t need: <code class="language-plaintext highlighter-rouge">install-docker.sh</code>, <code class="language-plaintext highlighter-rouge">install-vim.sh</code>, <code class="language-plaintext highlighter-rouge">install-starship.sh</code>, <code class="language-plaintext highlighter-rouge">install-nerdfonts.sh</code></p>

<p>All scripts support cleanup - e.g. <code class="language-plaintext highlighter-rouge">./install-vim.sh --clean</code> (remove configs) or <code class="language-plaintext highlighter-rouge">--clean-all</code> (full uninstall).</p>

<p>The full setup installs:</p>
<ul>
  <li><strong>tmux</strong> - keeps your sessions alive when you disconnect</li>
  <li><strong>vim</strong> with plugins (NERDTree, themes, git integration)</li>
  <li><strong>Docker</strong></li>
  <li><strong>Tailscale</strong> - the magic that makes this work from anywhere</li>
  <li><strong>Starship prompt</strong> - because life’s too short for ugly terminals</li>
</ul>

<h3 id="step-2-connect-to-tailscale">Step 2: Connect to Tailscale</h3>

<div class="language-bash highlighter-rouge"><div class="highlight"><pre class="highlight"><code><span class="nb">sudo </span>tailscale up
</code></pre></div></div>

<p>Follow the URL it gives you to authenticate. Then grab your Tailscale IP:</p>

<div class="language-bash highlighter-rouge"><div class="highlight"><pre class="highlight"><code>tailscale ip
</code></pre></div></div>

<p>Keep this IP handy - you’ll need it for Termius.</p>

<h3 id="step-3-set-up-termius">Step 3: Set Up Termius</h3>

<ol>
  <li>Open Termius → tap “+” → “New Host”</li>
  <li>Enter your Tailscale IP as hostname</li>
  <li>Add your username and password (or set up SSH keys)</li>
</ol>

<p>Connect and you’re in!</p>

<h3 id="step-4-using-tmux-essential-for-mobile">Step 4: Using tmux (Essential for Mobile)</h3>

<p>Start a named session:</p>

<div class="language-bash highlighter-rouge"><div class="highlight"><pre class="highlight"><code>tmux new <span class="nt">-s</span> dev
</code></pre></div></div>

<p>Now here’s the beauty - if your connection drops (happens on mobile), just reconnect and run:</p>

<div class="language-bash highlighter-rouge"><div class="highlight"><pre class="highlight"><code>tmux attach <span class="nt">-t</span> dev
</code></pre></div></div>

<p>Everything’s exactly where you left it.</p>

<p>Quick tmux commands (prefix is <code class="language-plaintext highlighter-rouge">Ctrl+a</code>):</p>

<table>
  <thead>
    <tr>
      <th>What</th>
      <th>Keys</th>
    </tr>
  </thead>
  <tbody>
    <tr>
      <td>New window</td>
      <td><code class="language-plaintext highlighter-rouge">Ctrl+a c</code></td>
    </tr>
    <tr>
      <td>Next/prev window</td>
      <td><code class="language-plaintext highlighter-rouge">Ctrl+a n</code> / <code class="language-plaintext highlighter-rouge">Ctrl+a p</code></td>
    </tr>
    <tr>
      <td>Split screen</td>
      <td><code class="language-plaintext highlighter-rouge">Ctrl+a \|</code> or <code class="language-plaintext highlighter-rouge">Ctrl+a -</code></td>
    </tr>
    <tr>
      <td>Detach</td>
      <td><code class="language-plaintext highlighter-rouge">Ctrl+a d</code></td>
    </tr>
  </tbody>
</table>

<h3 id="step-5-install-claude-code">Step 5: Install Claude Code</h3>

<div class="language-bash highlighter-rouge"><div class="highlight"><pre class="highlight"><code>npm <span class="nb">install</span> <span class="nt">-g</span> @anthropic-ai/claude-code
</code></pre></div></div>

<p>Now just run <code class="language-plaintext highlighter-rouge">claude</code> and start coding from your phone!</p>

<h3 id="step-6-add-claude-hud-optional">Step 6: Add Claude HUD (Optional)</h3>

<p><a href="https://github.com/jarrodwatts/claude-hud">Claude HUD</a> adds a statusline showing context usage, active tools, running agents, and todo progress.</p>

<blockquote class="twitter-tweet"><p lang="en" dir="ltr">Claude HUD demo</p>&mdash; Jarrod Watts (@jarrodwatts) <a href="https://twitter.com/jarrodwatts/status/2007579355762045121?ref_src=twsrc%5Etfw">January 2026</a></blockquote>
<script async="" src="https://platform.twitter.com/widgets.js" charset="utf-8"></script>

<p>Install it from within Claude Code:</p>

<div class="language-plaintext highlighter-rouge"><div class="highlight"><pre class="highlight"><code>/plugin marketplace add jarrodwatts/claude-hud
/plugin install claude-hud
/claude-hud:setup
</code></pre></div></div>

<h3 id="step-7-add-speech-to-text-optional">Step 7: Add Speech-to-Text (Optional)</h3>

<p>Typing on a phone keyboard gets old fast. Speech-to-text makes Claude Code on mobile genuinely productive - dictate your prompts instead of pecking at tiny keys.</p>

<p><strong>For iPhone/iPad: <a href="https://wisprflow.ai">Wispr Flow</a></strong></p>

<p>Wispr Flow is an AI voice keyboard that works inside any app. Install it, enable the keyboard in iOS Settings, then switch to it when you want to dictate in Termius.</p>

<ul>
  <li>Automatically adds punctuation and removes filler words</li>
  <li>Works in 100+ languages</li>
  <li>Free tier gives 2,000 words/week</li>
</ul>

<p>To use: tap the globe icon on your keyboard → select Wispr Flow → start talking.</p>

<p><strong>For Desktop (Mac/Windows/Linux): <a href="https://github.com/josiahsrc/voquill">Voquill</a></strong></p>

<p>If you’re also using Claude Code from your desktop, <a href="https://github.com/josiahsrc/voquill">Voquill</a> is an open-source alternative worth checking out.</p>

<ul>
  <li>Runs Whisper locally (no cloud required) or via Groq API</li>
  <li>AI cleanup removes filler words automatically</li>
  <li>Personal glossary for technical terms</li>
  <li>AGPLv3 licensed</li>
</ul>

<p>Both tools turn voice into polished text, which is exactly what you want when dictating code prompts.</p>

<h3 id="pro-tips">Pro Tips</h3>

<p><strong>tmux plugins</strong> - Press <code class="language-plaintext highlighter-rouge">Ctrl+a Shift+i</code> after first launch to install session persistence and vim integration.</p>

<p><strong>Multiple machines?</strong> Run <code class="language-plaintext highlighter-rouge">tailscale status</code> to see all your devices. Add each to Termius and switch between them easily.</p>

<h3 id="why-this-works-so-well">Why This Works So Well</h3>

<p>Tailscale creates a secure mesh network between your devices. Termius gives you a proper terminal with a mobile-friendly keyboard row (Ctrl, Esc, arrows). And tmux means you never lose your work when switching apps or losing signal.</p>

<p>I’ve used this setup on trains, buses and coffee shops. It’s surprisingly usable for quick bug fixes and code reviews. Give it a shot!</p>]]></content><author><name>Anuraj R.</name></author><category term="notes" /><category term="Linux" /><category term="AI" /><category term="Tutorial" /><category term="AI-assisted" /><summary type="html"><![CDATA[This post was written with assistance from Claude, an AI by Anthropic.]]></summary></entry><entry><title type="html">Debugging Embedded Targets with GDB</title><link href="/notes/gdb-embedded/" rel="alternate" type="text/html" title="Debugging Embedded Targets with GDB" /><published>2025-02-24T00:00:00+00:00</published><updated>2025-02-24T00:00:00+00:00</updated><id>/notes/gdb-embedded</id><content type="html" xml:base="/notes/gdb-embedded/"><![CDATA[<p>Notes and resources on how to debug an embedded target with GDB and a jtag/swd adapter. I will keep updating the post as I keep finding good resources.</p>

<ul>
  <li><a href="https://www.youtube.com/watch?v=_1u7IOnivnM">https://www.youtube.com/watch?v=_1u7IOnivnM</a></li>
  <li>PlatformIO blog - <a href="https://piolabs.com/blog/insights/debugging-introduction.html">https://piolabs.com/blog/insights/debugging-introduction.html</a></li>
  <li>GDB colourful dashboard with python - <a href="https://github.com/cyrus-and/gdb-dashboard">https://github.com/cyrus-and/gdb-dashboard</a></li>
  <li><a href="https://stackoverflow.com/questions/3775445/general-jtag-working-flow-in-an-embedded-development-system">https://stackoverflow.com/questions/3775445/general-jtag-working-flow-in-an-embedded-development-system</a></li>
  <li><a href="https://www.actuatedrobots.com/debugging-with-jtag/">https://www.actuatedrobots.com/debugging-with-jtag/</a></li>
  <li><a href="https://www.youtube.com/watch?v=-E5py-0JSXk">https://www.youtube.com/watch?v=-E5py-0JSXk</a></li>
  <li>Memfault Blog on GDB Python API - <a href="https://interrupt.memfault.com/blog/automate-debugging-with-gdb-python-api">https://interrupt.memfault.com/blog/automate-debugging-with-gdb-python-api</a></li>
</ul>]]></content><author><name>Anuraj R.</name></author><category term="notes" /><category term="Embedded" /><category term="Tutorial" /><summary type="html"><![CDATA[Notes and resources on how to debug an embedded target with GDB and a jtag/swd adapter. I will keep updating the post as I keep finding good resources.]]></summary></entry><entry><title type="html">Tumbller Cryptobot System Design</title><link href="/robotics/tumbller-cryptobot-architecture/" rel="alternate" type="text/html" title="Tumbller Cryptobot System Design" /><published>2024-12-06T00:00:00+00:00</published><updated>2024-12-06T00:00:00+00:00</updated><id>/robotics/tumbller-cryptobot-architecture</id><content type="html" xml:base="/robotics/tumbller-cryptobot-architecture/"><![CDATA[<p>Last month, I was at Devcon 7 in Bangkok with my friends Venkat and Sachin. We had a small demo with our cryptobot Tumbllers there. Let’s have a look at the system design of the setup to understand how the tumbller cryptobot works.</p>

<h3 id="hardware">Hardware</h3>

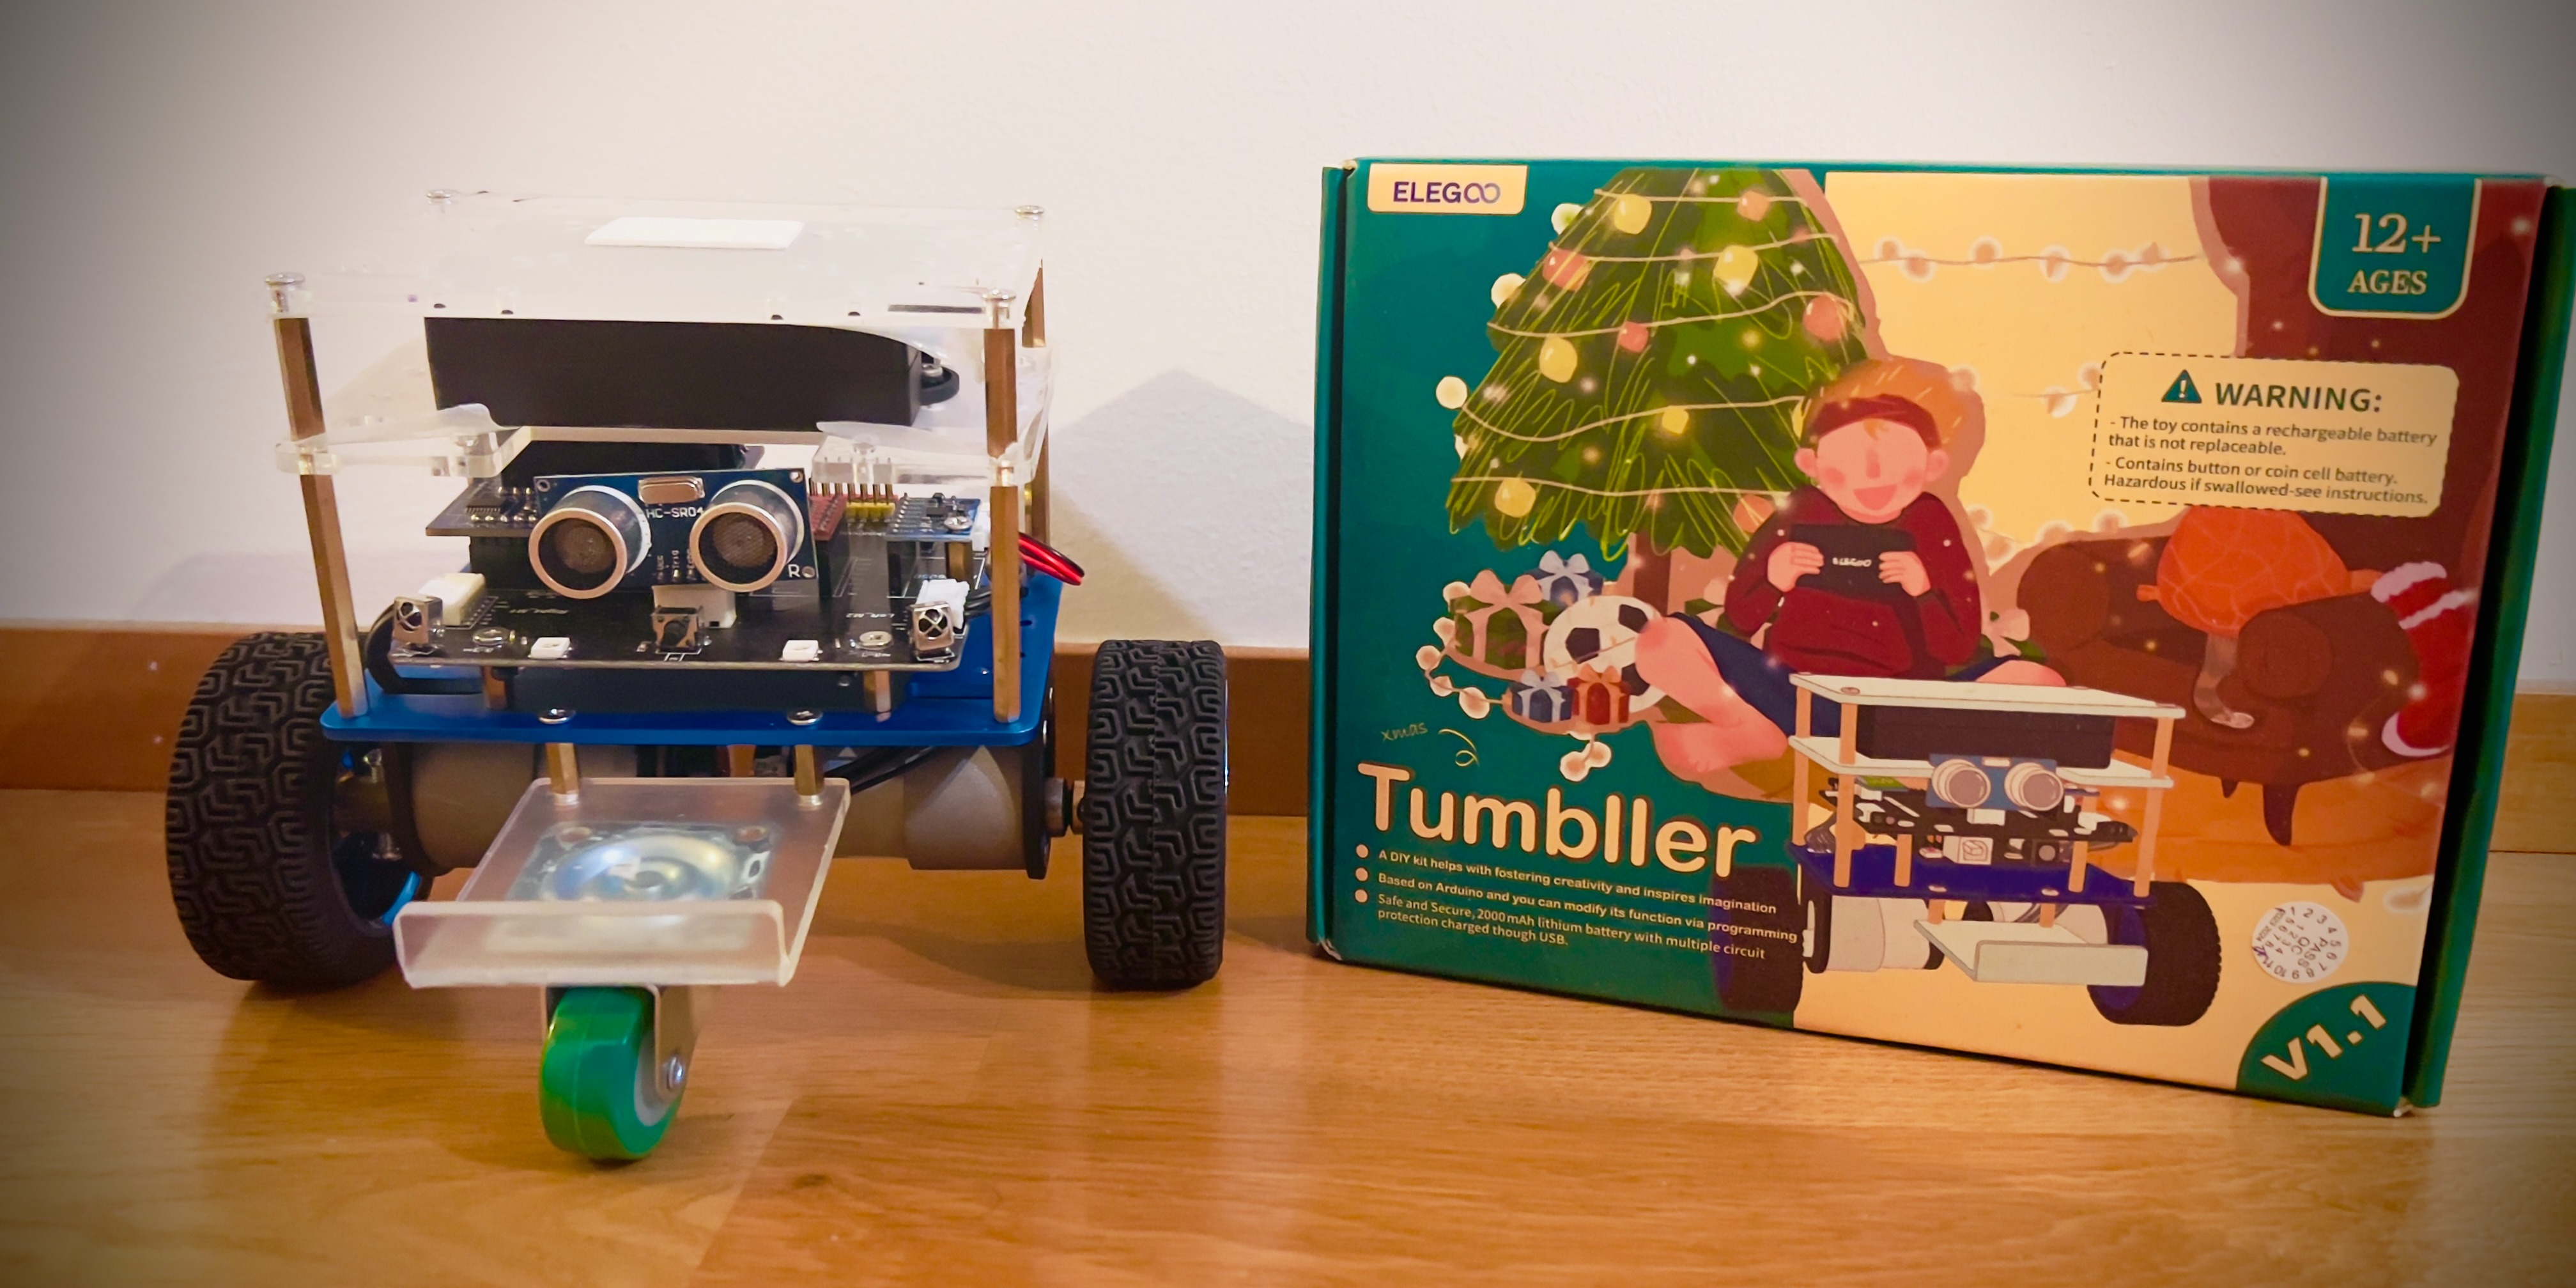
<p>Tumbller is a self-balancing robotics educational kit from Elegoo. It runs on an Arduino Nano and does not have WiFi. To add WiFi to the Tumbller we decided to use an Arduino Nano ESP32 because it has the same pinout as Arduino Nano. But we had a small problem - the Tumbller PCB runs on 5V and Nano ESP32 on 3.3V. We designed a custom plugin board to fit on the Tumbller PCB with voltage level translator in between the MCU and PCB board. We got the plugin board manufactured from JLCPCB in China. The plugin board had some issues in bringing back the encoder and sensor signals back to Arduino Nano ESP32. So we added the caster wheel to the robot to allow testing robot without self-balancing functionality.</p>

<figure>
    <a href="/assets/images/blog/2024-12-06-tumbller-kit.jpg"><img src="/assets/images/blog/2024-12-06-tumbller-kit.jpg" /></a>
    <figcaption>Tumbller Kit</figcaption>
</figure>
<p><br />
Here is a 3D render of the plugin board we designed.
<br /></p>
<video controls="" style="max-width:100%; height:auto;">
  <source src="/assets/videos/2024-12-06-cyptobot-tumbler-plugin.mp4" type="video/mp4" />
  Your browser does not support the video tag.
</video>
<p><br />
The video stream from our YakRover weekly meetings where I explain the entire process of PCB design and manufacturing for Tumbller Plugin.
<br /></p>
<iframe width="560" height="315" src="https://www.youtube-nocookie.com/embed/7VkJM0gVBCo?si=P90SUkcu1TfINJ7z&amp;start=105" title="YouTube video player" frameborder="0" allow="accelerometer; autoplay; clipboard-write; encrypted-media; gyroscope; picture-in-picture; web-share" referrerpolicy="strict-origin-when-cross-origin" allowfullscreen=""></iframe>
<p><br /></p>

<p>We also put a camera ESP32 on the robot to make it FPV bot. The camera is basically ESP32-CAM devkit. Each of our tumbller had two ESP32 microcontrollers. Both the ESP32 MCUs connected to the same wifi access point. Let’s call the ESP32 MCU controlling the tumbller robot motion <em>tumbller-esp32-s3</em> and the camera ESP32 as <em>tumbller-esp-cam</em>. Each of the ESP32 MCU exposed functionalities or affordances of the robot on the local network as a http REST endpoint.</p>

<h3 id="software">Software</h3>

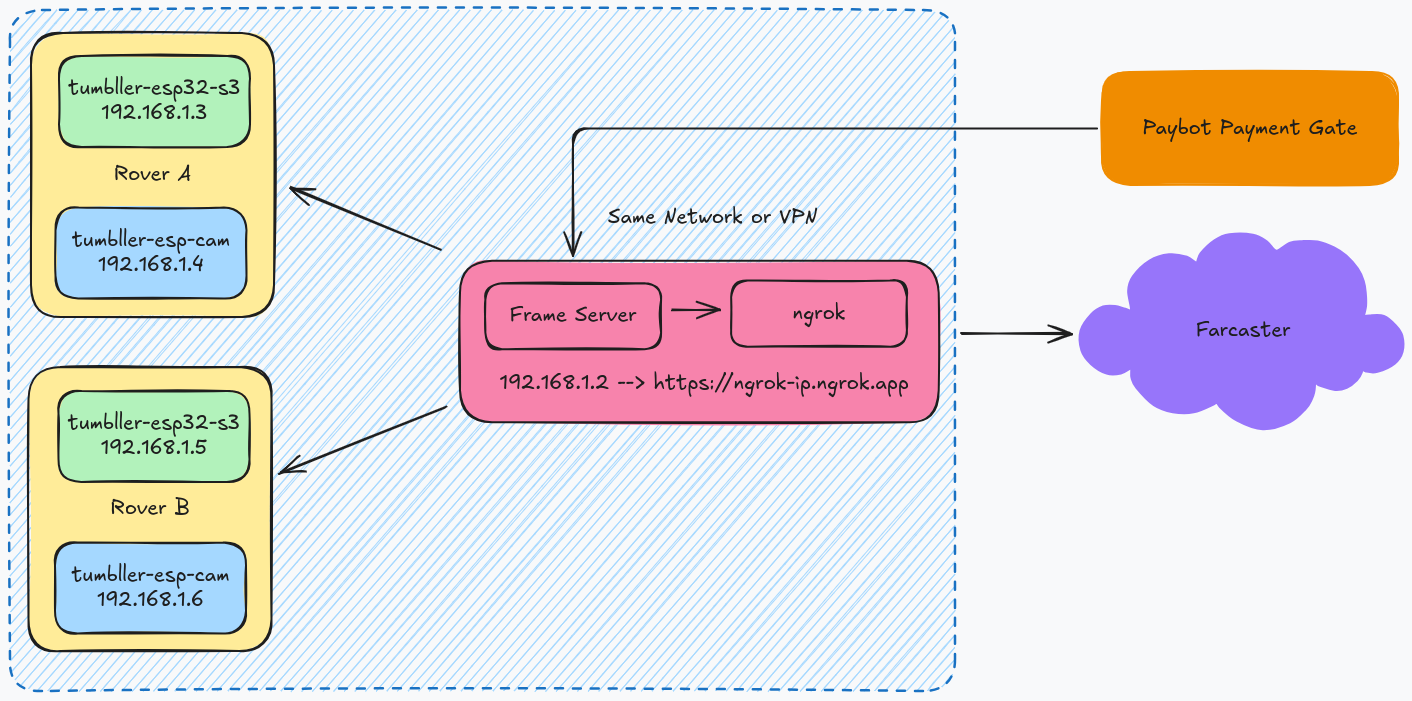
<p>A bird’s eye view of the software stack to control the robots with farcaster frame-v1 and paybot payment gate is shown below.</p>

<figure>
    <a href="/assets/images/blog/2024-12-06-cryptobot-tumbller-fcframe.png"><img src="/assets/images/blog/2024-12-06-cryptobot-tumbller-fcframe.png" /></a>
    <figcaption>Tumbller Cryptobot System Design</figcaption>
</figure>

<p>The <em>tumbller-esp32-s3</em> exposes the motion and motor control affordance of the cryptobot via five endpoints by running a webserver. The endpoints <code class="language-plaintext highlighter-rouge">/move/forward</code>, <code class="language-plaintext highlighter-rouge">/move/backward</code>, <code class="language-plaintext highlighter-rouge">/move/left</code>, <code class="language-plaintext highlighter-rouge">/move/right</code> and <code class="language-plaintext highlighter-rouge">/move/stop</code> control the movements for forward, backward, left, right and stop respectively.</p>

<p>The <em>tumbller-esp-cam</em> exposes the camera image via the <code class="language-plaintext highlighter-rouge">/getImage</code> endpoint so that when a GET request is sent to the endpoint, the server on <em>tumbller-esp-cam</em> would return a image taken by the camera.</p>

<p>The server for frames-v1 is written in python. The frames-v1 server, <em>tumbller-esp32-s3</em> and the <em>tumbller-esp-cam</em> need to be on the same network or VPN. We used tailscale to put all three on the same VPN. The ESP32s can be exposed on the tailscale VPN with tailscale subnets. If the frames server is running locally on a computer without DNS name then ngrok can be used to expose to the outside world. The payment gate for the rovers is generated using the awesome <strong>Paybot</strong> farcaster bot by Rob Recht and Richard Sun. They helped us a lot in setting up the payment gate quickly with their farcaster bot.</p>

<p>The frame-v1 server sits in between the Tumbllers and farcaster translating the frame UI actions to appropriate <em>tumbller-esp32-s3</em> and <em>tumbller-esp-cam</em> REST calls. I explain and help the setup of the frame server for Venkat’s Tumbller in Seattle here in this video.
<br /></p>

<iframe width="560" height="315" src="https://www.youtube.com/embed/YMp6Q-V-Pxo?si=RupmGAWGCseMMLDd&amp;start=157" title="YouTube video player" frameborder="0" allow="accelerometer; autoplay; clipboard-write; encrypted-media; gyroscope; picture-in-picture; web-share" referrerpolicy="strict-origin-when-cross-origin" allowfullscreen=""></iframe>

<p><br />
The current version of the farcaster frame-v1 server allows selection between two rovers and manages the session and payment gates for each rover independently. Each session runs for 2 minutes after a payment of 1USDC.</p>

<h3 id="devcon-and-future-work">Devcon and future work</h3>

<p>We did have small hiccups during setup at Devcon but we were able to solve all the problems and have the demo running for the two rovers at Devcon.</p>

<p>First we had some problems with the WiFi setup because of 2.4GHz congestion and Tailscale VPN. Since I had the ESP32s on a subnet via the RaspberryPi, they would become invisible without the RaspberryPi to my frame-v1 server without the Raspberry turned on even though all the devices were on the same network. It took me almost a day to figure this out. As a temporary solution at Devcon I turned off the VPN after which the system worked nicely.</p>

<p>I also had problems figuring out how to trigger a particular user’s wallet with fid information from user interaction with frame and paybot. I finally just used the farcaster-py library to get the fname from fid and then use the fname and paybot together to get the payment gate working properly.</p>

<p>But after these two problems were solved the system mostly worked smoothly.</p>

<figure style="display: flex; gap: 20px; align-items: flex-start;">
    <div style="flex: 1;">
        <a href="/assets/images/blog/2024-12-06-devcon-pic.jpg">
            <img src="/assets/images/blog/2024-12-06-devcon-pic.jpg" style="width:100%; height:auto;" />
        </a>
    </div>
    <div style="flex: 1;">
        <video controls="" style="width:100%; height:auto;">
            <source src="/assets/videos/2024-12-06-tumbller-sachin.mp4" type="video/mp4" />
            Your browser does not support the video tag.
        </video>
    </div>
</figure>
<figcaption style="text-align: center; margin-top: 10px;">
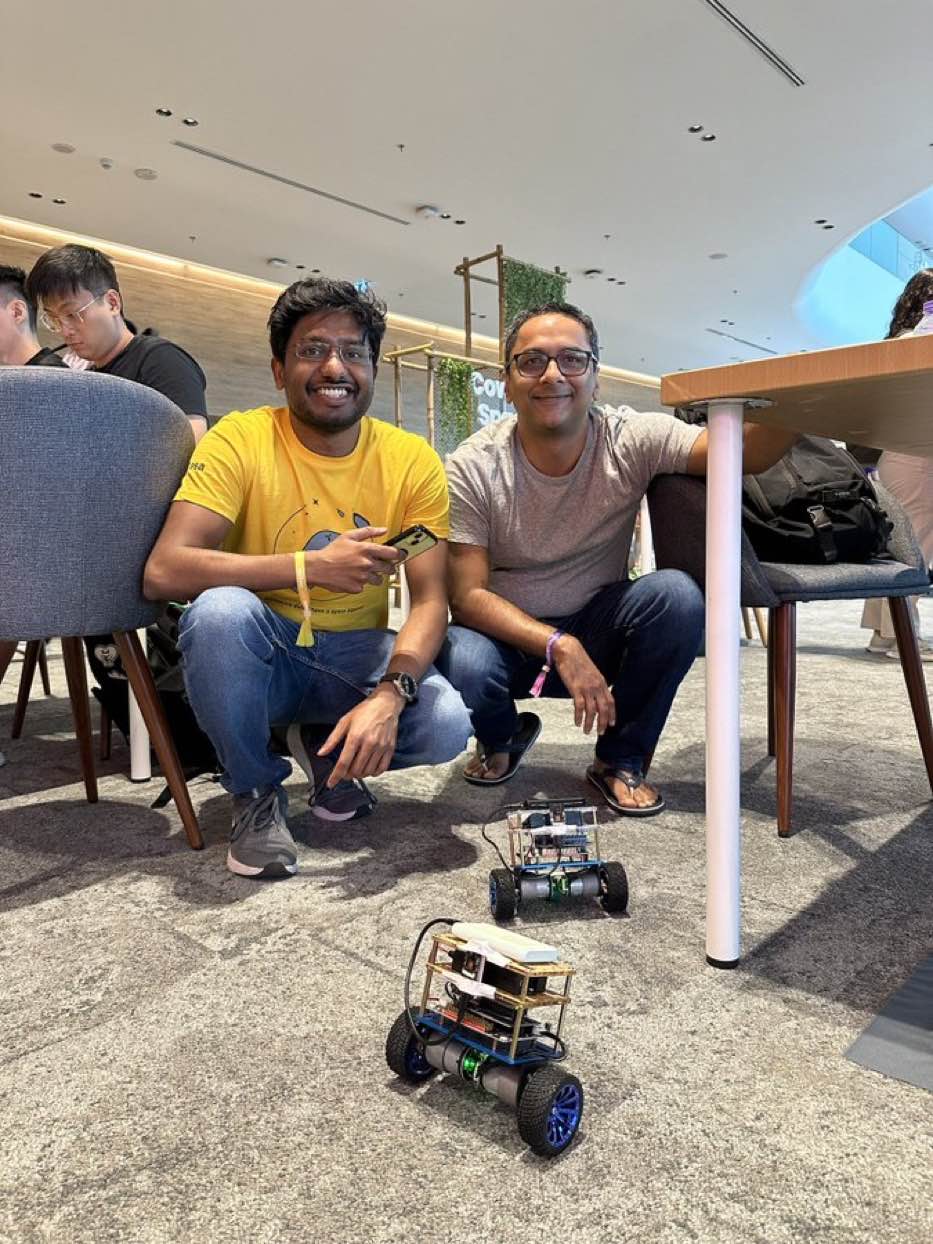
    <strong>Image:</strong> Venkat and me at Devcon 7 with our Tumbller cryptobots<br />
    <strong>Video:</strong> Sachin playing with the cryptobot
</figcaption>

<p>There is a lot of improvement still needed and a quick list suggested by Venkat in our discord group.</p>

<ul>
  <li>Ruggedize basics (new board, wheel mechanics fixing, permanent mount for cam, cleaner comms architecture)</li>
  <li>UI bugs on frames</li>
  <li>Fix wallet flow limitations</li>
  <li>Better UX (eg photo per step, display)</li>
  <li>Expand payload (sensors etc)</li>
  <li>Onchain memory, recording images, game aspect etc</li>
  <li>Extend to sunfounder and non crypto UX</li>
  <li>Crypto-economic UX</li>
</ul>

<p>We had a discussion about the future steps for our cryptobot network on our Yak Robotics Garage Weekly Meeting.</p>

<iframe width="560" height="315" src="https://www.youtube.com/embed/eGOfkMKiweY?si=64QiSXmJ8nzjieYn" title="YouTube video player" frameborder="0" allow="accelerometer; autoplay; clipboard-write; encrypted-media; gyroscope; picture-in-picture; web-share" referrerpolicy="strict-origin-when-cross-origin" allowfullscreen=""></iframe>

<p><br />
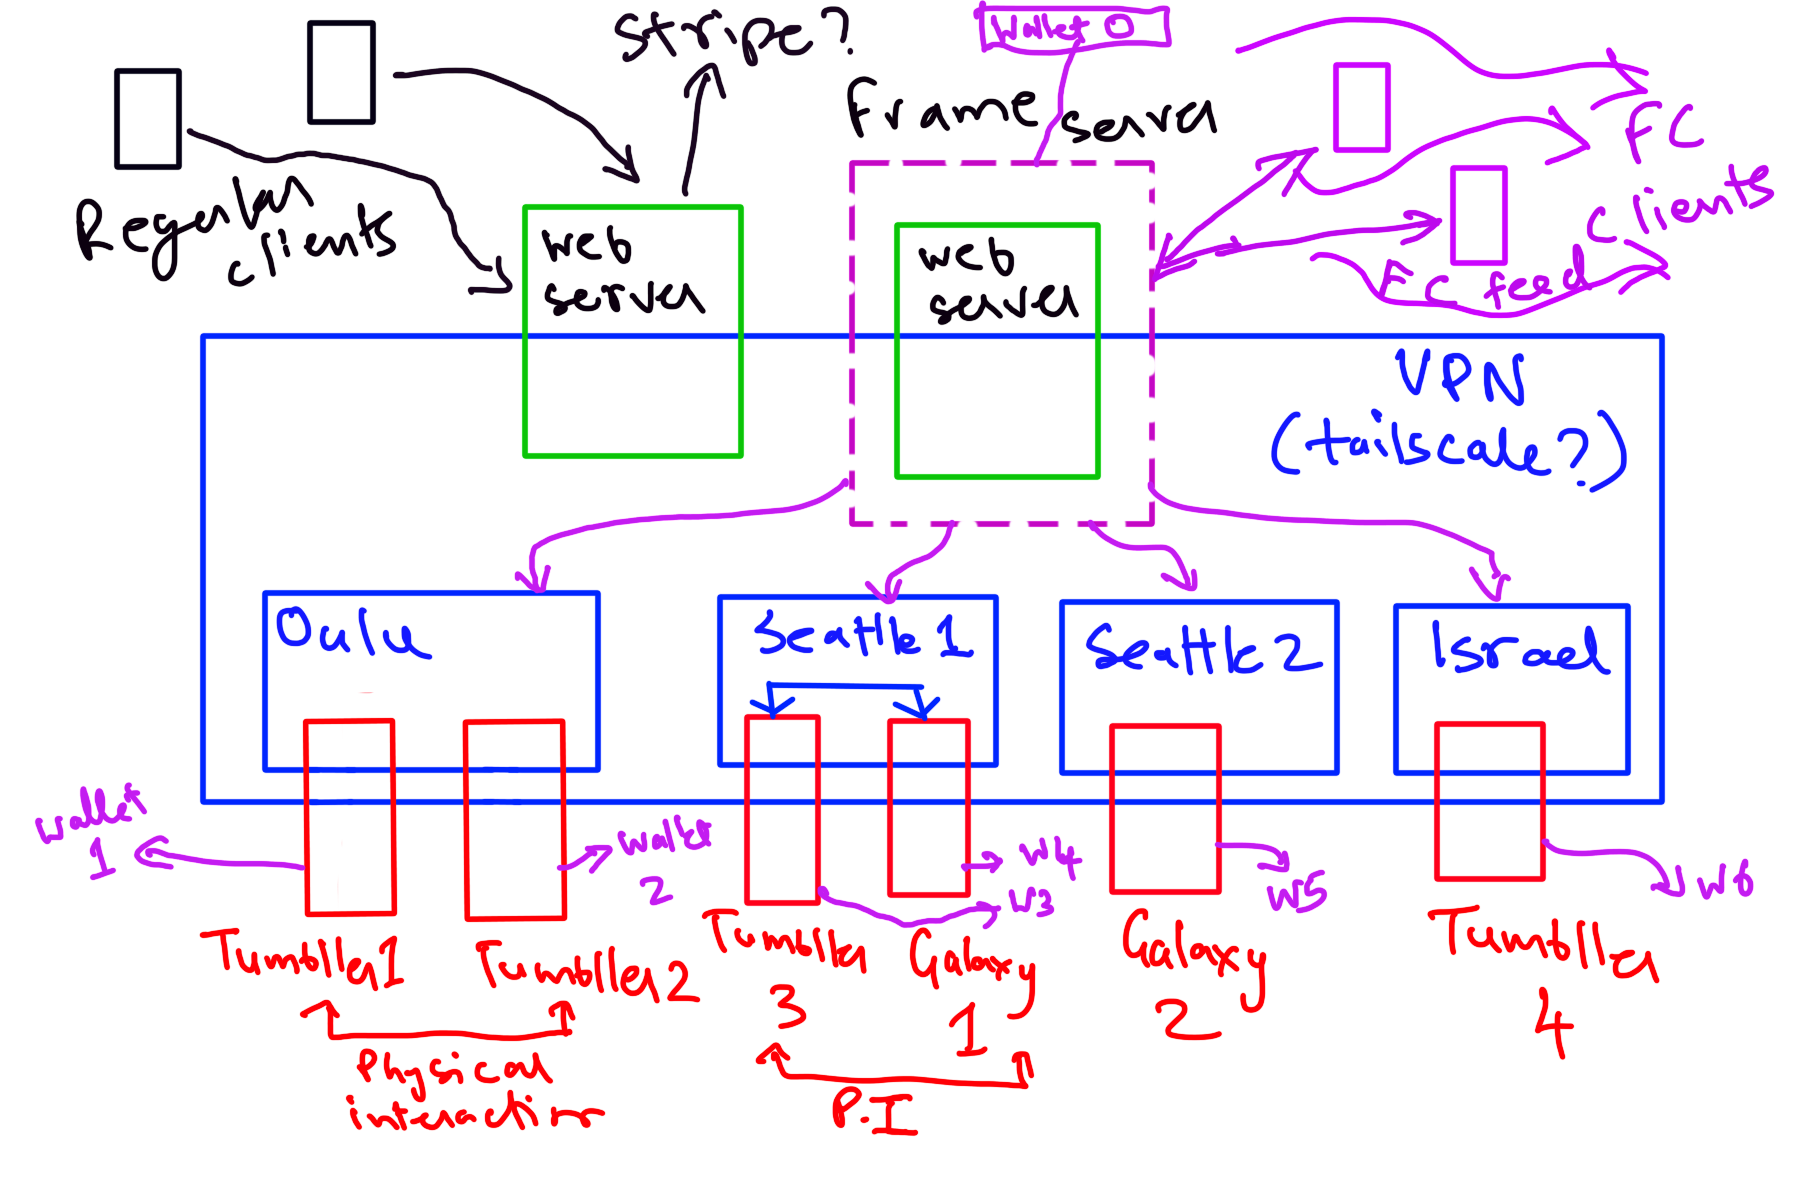
For the next steps, we should be able to get some parts of the system design shown below in the coming months with frames-v2.
For a speculative riff on Crypto-economics of the rovers here is Venkat’s post on his substack <a href="https://contraptions.venkateshrao.com/p/miniaturized-economies">Contraptions</a></p>

<figure>
    <a href="/assets/images/blog/2024-12-06-cryptobot-network-sd.png"><img src="/assets/images/blog/2024-12-06-cryptobot-network-sd.png" /></a>
    <figcaption>Future Cryptobot Network System Design Diagram by Venkat</figcaption>
</figure>

<p>I have been showing around our social cryptobots to people at Devcon and later here in Finland. It is really satisfying to watch people’s reactions to the social cryptobots. There seems to be something rather unique about them because it resonates with so many people with a wide variety of backgrounds, engineers and non-engineers alike.</p>

<p>We are in the process of making an update to the plugin board so that other people could just buy the Tumbller kit and join the cryptobot party.</p>]]></content><author><name>Anuraj R.</name></author><category term="robotics" /><category term="Cryptobotics" /><summary type="html"><![CDATA[Last month, I was at Devcon 7 in Bangkok with my friends Venkat and Sachin. We had a small demo with our cryptobot Tumbllers there. Let’s have a look at the system design of the setup to understand how the tumbller cryptobot works.]]></summary></entry><entry><title type="html">Cryptobotics - A New Robotics Frontier?</title><link href="/robotics/cryptobotics/" rel="alternate" type="text/html" title="Cryptobotics - A New Robotics Frontier?" /><published>2024-11-06T00:00:00+00:00</published><updated>2024-11-06T00:00:00+00:00</updated><id>/robotics/cryptobotics</id><content type="html" xml:base="/robotics/cryptobotics/"><![CDATA[<p>Some of my friends and I have been exploring blockchains for the last few years at <a href="https://www.yakcollective.org/projects/yarg.html">Yak Robotics Garage</a> for its application to Robotics and Internet of Things. There are many people experimenting with blockchains for Robotics around the world, but everybody just describes this new emerging field of study with different word combinations involving blockchains and robotics. I never found a name that would capture the vibe of the field. While thinking about it I randomly posted on <a href="https://www.farcaster.xyz/">Farcaster</a>, a possible name for this new field which seems to have resonated a bit with people.</p>

<blockquote>
  <p><a href="https://warpcast.com/anurajenp/0xea820529">Crypto + Robotics = Cryptobotics</a></p>
</blockquote>

<p>I think Cryptobotics broadly captures the vibe and what the field is all about - permissionless-ness, decentralization, distributed systems, blockchains, smart-contracts, zk-proofs, zk-SNARKS, cryptocurrencies and robotics.</p>

<p>The time for Cryptobotics has arrived and as Marc Andreessen would say <em>“It’s time to build” - Cryptobots</em>.</p>

<p>Infact we at <a href="https://www.yakcollective.org/projects/yarg.html">Yak Robotics Garage</a> built a small FPV cryptobot, controlled with <a href="https://www.farcaster.xyz/">Farcaster</a> frames. We are bringing it to Devcon in Bangkok.</p>

<p>So if you want to play with our cryptobots, come meet us at Devcon. Follow us on Farcaster/Twitter to know where we have setup our cryptobots. We are <a href="https://warpcast.com/vgr/">vgr</a> and <a href="https://warpcast.com/anurajenp">anurajenp</a> on Farcaster/Twitter.</p>]]></content><author><name>Anuraj R.</name></author><category term="robotics" /><category term="Cryptobotics" /><summary type="html"><![CDATA[Some of my friends and I have been exploring blockchains for the last few years at Yak Robotics Garage for its application to Robotics and Internet of Things. There are many people experimenting with blockchains for Robotics around the world, but everybody just describes this new emerging field of study with different word combinations involving blockchains and robotics. I never found a name that would capture the vibe of the field. While thinking about it I randomly posted on Farcaster, a possible name for this new field which seems to have resonated a bit with people.]]></summary></entry><entry><title type="html">Discord Stream Kit Overlay setup for Yak Collective</title><link href="/video-editing/discord-stream-kit/" rel="alternate" type="text/html" title="Discord Stream Kit Overlay setup for Yak Collective" /><published>2023-03-14T00:00:00+00:00</published><updated>2023-03-14T00:00:00+00:00</updated><id>/video-editing/discord-stream-kit</id><content type="html" xml:base="/video-editing/discord-stream-kit/"><![CDATA[<p>I have been experimenting with livestreams over the last few months with OBS. Last weekend my friend Nathan and I set up stream kit for our <a href="https://www.yakcollective.org/about.html">Yak Collective</a> study group. With some neat CSS tricks by Nathan we were able to setup discord steamkit overlay for a nice looking streaming scene. Here is what yesterday’s stream looked like. 
<br /></p>
<iframe width="560" height="315" src="https://www.youtube.com/embed/qM_ZiKiBaLI" title="YouTube video player" frameborder="0" allow="accelerometer; autoplay; clipboard-write; encrypted-media; gyroscope; picture-in-picture; web-share" allowfullscreen=""></iframe>
<p><br /></p>

<p>The audio still needs some work. But overall I am happy with the scene layout. The CSS added to the discord streamkit chat overlay below</p>

<div class="language-css highlighter-rouge"><div class="highlight"><pre class="highlight"><code><span class="nt">body</span> <span class="p">{</span> <span class="nl">background-color</span><span class="p">:</span> <span class="n">rgba</span><span class="p">(</span><span class="m">0</span><span class="p">,</span> <span class="m">0</span><span class="p">,</span> <span class="m">0</span><span class="p">,</span> <span class="m">0</span><span class="p">);</span> <span class="nl">margin</span><span class="p">:</span> <span class="m">0px</span> <span class="nb">auto</span><span class="p">;</span> <span class="nl">overflow</span><span class="p">:</span> <span class="nb">hidden</span><span class="p">;}</span> 
<span class="nt">div</span><span class="o">[</span><span class="nt">class</span><span class="o">^=</span><span class="s2">'Chat_chatContainer__'</span><span class="o">]</span> <span class="p">{</span> <span class="nl">height</span><span class="p">:</span> <span class="m">950px</span> <span class="cp">!important</span><span class="p">;</span> <span class="nl">width</span><span class="p">:</span> <span class="nb">auto</span> <span class="cp">!important</span><span class="p">;</span> <span class="p">}</span> 
<span class="nt">div</span><span class="o">[</span><span class="nt">class</span><span class="o">^=</span><span class="s2">'Chat_channelName__'</span><span class="o">]</span> <span class="p">{</span> <span class="nl">float</span><span class="p">:</span> <span class="nb">left</span><span class="p">;</span> <span class="err">width</span> <span class="err">100%;</span> <span class="p">}</span> 
<span class="nt">ul</span><span class="o">[</span><span class="nt">class</span><span class="o">^=</span><span class="s2">'Chat_messages__'</span><span class="o">]</span> <span class="p">{</span> <span class="nl">height</span><span class="p">:</span> <span class="n">calc</span><span class="p">(</span><span class="m">950px</span> <span class="n">-</span> <span class="m">52px</span><span class="p">)</span> <span class="cp">!important</span><span class="p">;</span> <span class="nl">width</span><span class="p">:</span> <span class="n">calc</span><span class="p">(</span><span class="m">100%</span> <span class="n">-</span> <span class="m">16px</span><span class="p">);</span> <span class="p">}</span> 
<span class="nt">li</span><span class="o">[</span><span class="nt">class</span><span class="o">^=</span><span class="s2">'Chat_message__'</span><span class="o">]</span> <span class="p">{</span> <span class="nl">max-height</span><span class="p">:</span> <span class="nb">none</span> <span class="cp">!important</span><span class="p">;</span> <span class="p">}</span>
</code></pre></div></div>

<p>The CSS extends the chat window to the entire scene instead of a small rectangular box in previous distributed systems study group videos. Next step is to update the voice channel overlay CSS and enhance the audio somehow.</p>]]></content><author><name>Anuraj R.</name></author><category term="video-editing" /><category term="Video-Editing" /><summary type="html"><![CDATA[I have been experimenting with livestreams over the last few months with OBS. Last weekend my friend Nathan and I set up stream kit for our Yak Collective study group. With some neat CSS tricks by Nathan we were able to setup discord steamkit overlay for a nice looking streaming scene. Here is what yesterday’s stream looked like.]]></summary></entry><entry><title type="html">One year of video editing</title><link href="/video-editing/1year-video-editing/" rel="alternate" type="text/html" title="One year of video editing" /><published>2022-06-07T00:00:00+00:00</published><updated>2022-06-07T00:00:00+00:00</updated><id>/video-editing/1year-video-editing</id><content type="html" xml:base="/video-editing/1year-video-editing/"><![CDATA[<p>Last month I finished one year in the world of YouTube and exploring video editing. One of the obvious things one immediately realizes after jumping into video world is that it is way harder than it looks to create good video content. There are so many skills required for making good video content that I was just overwhelmed for the first 3-4 months.</p>

<p>But I have taken tiny steps, and moving forward really slowly. I could go faster if I was doing this full time. I tried a lot of things in the last one year and spent quite some money on different gears and trying out different software and video platforms. I made a lot of cringe content too, lol.</p>

<p>Some of the things I tried:</p>

<h3 id="gear">Gear</h3>

<ul>
  <li><strong>DJI Pocket 2</strong> <br />
It was a really good buy I think. It shoots in 4K and has a gimbal. The best thing about it is that it fits into my pocket. :D</li>
  <li><strong>Selfie stick</strong> with tripod and iPhone <br />
I have filming a lot with my iPhone too, so a simple tripod and selfie stick was useful</li>
  <li><strong>Gaming Laptop</strong> <br />
Another good buy. I thought I could edit with my old computer but it was just not powerful enough for full 4K video editing. So now I have a ASUS Zephyrus G14 Gaming Laptop</li>
  <li><strong>Tripod</strong> <br />
A good camera tripod. Haven’t used it much except the monopod stand from one of its legs which I used for the DJI Pocket 2</li>
</ul>

<h3 id="software">Software</h3>

<ul>
  <li><strong>Descript</strong> <br />
I used it in the beginning when I started. Really good transcription based editing feature. I wasn’t using it much so I canceled my subscription. It doesn’t have all the features of a full video editing software it seems.</li>
  <li><strong>Davinci Resolve</strong> <br />
Free full fledged video editing software and steeper learning curve. I use it right now for all my editing.</li>
  <li><strong>Canva</strong> <br />
Good software for all graphics needs. I use it mostly to make YouTube thumbnails.</li>
  <li><strong>OBS Studio</strong> <br />
Live Streaming and Screen Recording. Lots of feature and takes some time to get used to it.</li>
  <li><strong>Twitch Studio</strong> <br />
Tried it a few times to stream to Twitch my coding sessions. Easy to use.</li>
  <li><strong>Filmic Pro for iPhone</strong> <br />
Good software for iPhone for filming. Another phone can be used as a remote if they are on the same wifi. Good buy.</li>
  <li><strong>Luma Fusion for iOS</strong> <br />
Bought a few weeks ago. Trying it out now.</li>
</ul>

<h3 id="video-platoform">Video Platoform</h3>

<ul>
  <li><strong>Youtube</strong> <br />
I am mostly editing The Yak Collective channel. The content is created during our weekly meetings which I edit before uploading.</li>
  <li><strong>Instagram</strong> <br />
Tried out some travel videos on my personal instagram. Video editing tools inbuilt into instagram are good for stories. But auto suggested things like reels on instagram still not good as TikTok.</li>
  <li><strong>TikTok</strong> <br />
The suggested videos after browsing it only for some time is quite good.</li>
  <li><strong>Twitch</strong> <br />
Learning to stream my coding session. Feels live streaming is going to be much bigger in the coming decade.</li>
</ul>

<p>A lot of my weekends during the last one year has been going into trying out all the different software, gear and platforms. I haven’t much progress on the content creation and don’t have much to show for the amount of time I have spent on this. But I hope to keep continuing to learn as much as I can about video editing and content creation. I enjoy video editing, so let’s see where I will be next year.</p>]]></content><author><name>Anuraj R.</name></author><category term="video-editing" /><category term="Video-Editing" /><summary type="html"><![CDATA[Last month I finished one year in the world of YouTube and exploring video editing. One of the obvious things one immediately realizes after jumping into video world is that it is way harder than it looks to create good video content. There are so many skills required for making good video content that I was just overwhelmed for the first 3-4 months.]]></summary></entry><entry><title type="html">Qt compilation problems after fresh installation on Ubuntu</title><link href="/notes/Qt6-compiling-after-installation-fails/" rel="alternate" type="text/html" title="Qt compilation problems after fresh installation on Ubuntu" /><published>2021-08-27T00:00:00+00:00</published><updated>2021-08-27T00:00:00+00:00</updated><id>/notes/Qt6-compiling-after-installation-fails</id><content type="html" xml:base="/notes/Qt6-compiling-after-installation-fails/"><![CDATA[<p>I just made a fresh installation of Qt6 on Linux machine running Ubuntu. It was failing to build a default widget application with the error. From the error message it seemed to be some CMake error about not being able to find Qt libraries.</p>

<div class="language-bash highlighter-rouge"><div class="highlight"><pre class="highlight"><code>find_package<span class="o">(</span>Qt<span class="k">${</span><span class="nv">QT_VERSION_MAJOR</span><span class="k">}</span> COMPONENTS Widgets REQUIRED<span class="o">)</span>

Found package configuration file: /home/xxx/Qt/6.0.4/gcc_64/lib/cmake/Qt6/Qt6Config.make but it <span class="nb">set </span>Qt6_FOUND to FALSE so package <span class="s2">"Qt6"</span> is considered to be NOT FOUND. Reason given by package: Failed to find Qt component <span class="s2">"Widgets"</span> config file at<span class="s2">""</span>
</code></pre></div></div>

<p>But the <a href="https://forum.qt.io/topic/129346/widgets-component-is-not-recognized-in-cmakelist-file/2">solution</a> was to install some OpenGL libraries. Seems on Ubuntu installation of OpenGL is a requirement for running Qt. The problem went away after I installed <code class="language-plaintext highlighter-rouge">libgl1-mesa-dev</code> with the command</p>

<div class="language-plaintext highlighter-rouge"><div class="highlight"><pre class="highlight"><code>apt install libgl1-mesa-dev
</code></pre></div></div>]]></content><author><name>Anuraj R.</name></author><category term="notes" /><category term="C++" /><category term="Tutorial" /><summary type="html"><![CDATA[I just made a fresh installation of Qt6 on Linux machine running Ubuntu. It was failing to build a default widget application with the error. From the error message it seemed to be some CMake error about not being able to find Qt libraries.]]></summary></entry><entry><title type="html">Some new hobbies…</title><link href="/blog/some-new-hobbies/" rel="alternate" type="text/html" title="Some new hobbies…" /><published>2021-07-22T00:00:00+00:00</published><updated>2021-07-22T00:00:00+00:00</updated><id>/blog/some-new-hobbies</id><content type="html" xml:base="/blog/some-new-hobbies/"><![CDATA[<p>I have been on hiatus from Robotics for quite some time. The last time I worked with some field robots was in 2015. Around the end of last year ESA released a mini version of the ExoMars Rosalind Franklin rover that is going to launch next year.</p>

<iframe width="560" height="315" src="https://www.youtube.com/embed/1fSX_uG39Yw" title="YouTube video player" frameborder="0" allow="accelerometer; autoplay; clipboard-write; encrypted-media; gyroscope; picture-in-picture" allowfullscreen=""></iframe>

<p><br /></p>

<p>This got me excited as I could start building this rover and have fun playing with this toy rover. The software stack uses ROS which I last played with in 2014.</p>

<p>The global pandemic has restricted travel for more than an year and it seems traveling would limited for atleast one more year. I think this is a good time to start a new hobby of building small robots and rovers and end my hiatus from robotics.</p>

<p>I hope to document the progress on a blog and on a YouTube channel. Let’s see how far I can get building this rover.</p>]]></content><author><name>Anuraj R.</name></author><category term="blog" /><category term="Robotics" /><summary type="html"><![CDATA[I have been on hiatus from Robotics for quite some time. The last time I worked with some field robots was in 2015. Around the end of last year ESA released a mini version of the ExoMars Rosalind Franklin rover that is going to launch next year.]]></summary></entry><entry><title type="html">Windows Terminal Setup</title><link href="/notes/tech-notes-1/" rel="alternate" type="text/html" title="Windows Terminal Setup" /><published>2020-04-12T00:00:00+00:00</published><updated>2020-04-12T00:00:00+00:00</updated><id>/notes/tech-notes-1</id><content type="html" xml:base="/notes/tech-notes-1/"><![CDATA[<p>I have been using windows terminal for some time now and my experience in using it has been enjoyable. Right now the latest builds are available from Microsoft Store. I just installed the version avialable on the store and it seems to be the latest release available on GitHub.</p>

<p>Steps to get the my current setup are just to clone my <a href="https://github.com/anuraj-rp/dotfiles.git">dotfiles repo</a> on GitHub and copy-paste the content of wintermprofiles.json into the <em>profiles.json</em> file of windows terminal.</p>

<p>Opening the windows terminal settings should open the <em>profiles.json</em> file in the editor associated with json files.</p>

<p>Depending on the version of the Powershell Core used, it maybe required to change the path of the executable for Powershell Core to either 6 or 7 in the <em>profiles.json</em> file. By default it points to version 7.</p>

<p>Finally create a hard link between <em>profiles.json</em> file and json file in the GitHub repo.</p>

<div class="language-plaintext highlighter-rouge"><div class="highlight"><pre class="highlight"><code>$cd Path\To\Microsoft.WindowsTerminal_8wekyb3d8bbwe\LocalState
$mklink /h "profiles.json" "Path\To\dotfiles.git repo\wintermprofiles.json"
</code></pre></div></div>]]></content><author><name>Anuraj R.</name></author><category term="notes" /><category term="Windows" /><category term="Tutorial" /><summary type="html"><![CDATA[I have been using windows terminal for some time now and my experience in using it has been enjoyable. Right now the latest builds are available from Microsoft Store. I just installed the version avialable on the store and it seems to be the latest release available on GitHub.]]></summary></entry></feed>